UCaaS Phone Solutions (VoIP)
- Compliance
- Important & Helpful Information
- IP Fax
- Phone Numbers
- SIP Trunking
- Audio Conferencing
- VoIP Troubleshooting Tools
- Hosted PBX
- Router & Network Help
- 10DLC - TCR Messaging Compliance
- User Guide
- Admin Guide
Compliance
FCC Compliance/Abuse
Please be aware that any call originated on the DC Tech network is subject to inspection and investigation if the call is suspected of being fraudulent, abusive, or illegal. Calls meeting any of these criteria will be blocked. If these conditions are repeated, becoming excessive, the subscriber may be disconnected from the DC Tech IT, LLC network and may be subject to further investigation by the FCC for enforcement of the TRACED Act and the subscriber may be subject to fines and penalties imposed by the FCC or the jurisdictional court.”
Important & Helpful Information
Voice Network Redundancy
DC Tech operates what we refer to as an Active/Active Geo-Redundant Network.
The concept is simple… spread infrastructure across multiple geographically dispersed locations and keep it all in sync. The execution however, is what’s borderline magic :).
This method of redundancy helps ensure that if something goes wrong in one data center (think power loss, hardware failure, connectivity loss, etc…), services can keep running smoothly from another.
And because everything is always in sync, all your call routes, settings, and history are always available and working as expected.
This helps DC Tech & their Partners limit service disruptions for their customers, ultimately leading to a better customer experience.
How it works
Each data center operates dedicated clusters of servers acting as standalone systems and as a backup to other data centers in the ecosystem.
These clusters are for critical components of the voice infrastructure like the session border controller, multi-tenant PBX, billing engine and nearly all other dependencies.
In most cases these clusters are horizontally scalable to increase processing capacity, and in some cases, managed by a load balancing system further running in High Availability (HA) locally.
Connectivity to a specific data center is determined by the DNS record used by the customers equipment. And aside from the replication magic mentioned earlier, DNS is the primary tool in keeping your customers service running.
When a customer is onboarded, its devices connect to their primary datacenter and server. Through out the course of the service use, all the settings and call history are both stored locally and actively replicated in real-time to all the other datacenters via our replication messaging bus.
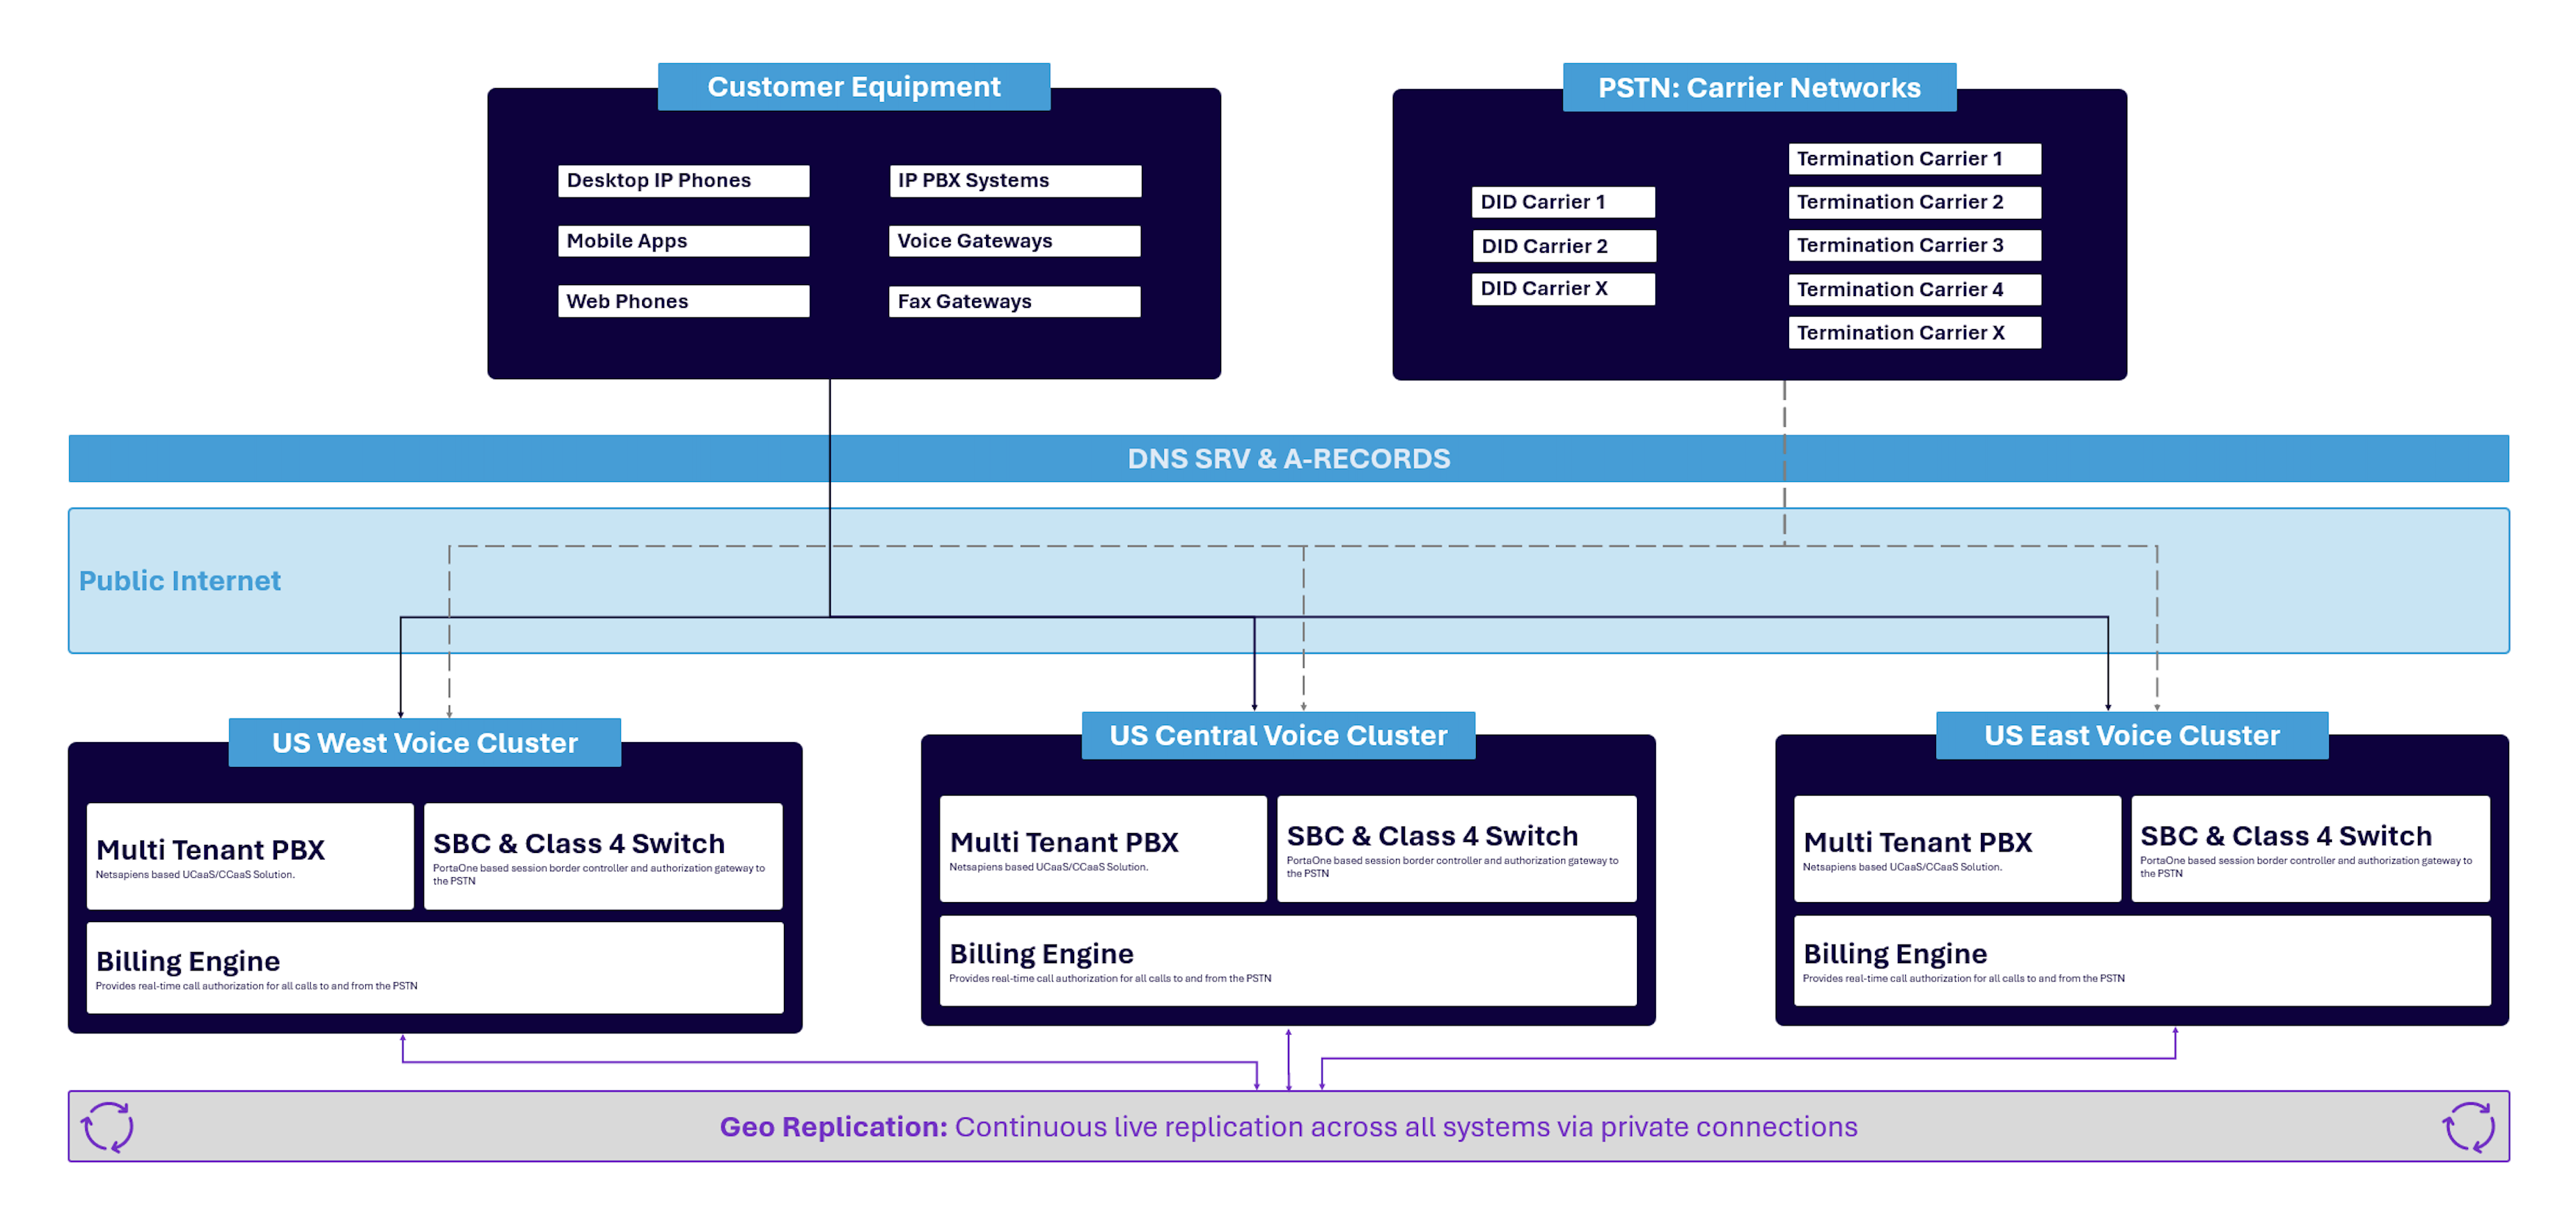
Customer Endpoint DNS Redundancy Methods
SRV-Record: This is the default method implemented when auto provisioning your customers devices on our hosted PBX solution.
During bootup the device will query a DNS server for the SRV record of its configured SIP Server. Unlike a standard A-Record lookup, which contains a single IP, SRV responses will contain a list of servers with additional priority and distribution parameters.
That single query provides the device with several geo distributed datacenters it can connect to, with no need to reboot or flush local DNS settings.
Should a SIP Server become unresponsive or unavailable, during a re-registration or outbound call attempt, the device will then attempt to connect with the next server in its SRV list.
*For manually configured devices like IP PBXs, ATAs, Gateways, and the occasional one-off IP Phone, please check your devices administrative guides for instructions on how to implement SRV redundancy.
Standard A-Record: This method is inferior to SRV based redundancy and should only be considered as a last resort.
During bootup the device will query a DNS server for the A-Record of its configured SIP Server. The response will contain a single IP.
The device will then attempt to connect to the SIP Server via that IP.
Should that SIP Server become unresponsive or unavailable the device connection and its calls will fail.
In the event a SIP Server is globally unavailable, and our Infrastructure Team has determined that it cannot be immediately restored then its corresponding A-Record will be updated with the IP of another SIP Server capable of handling its load.
*Note the TTL on our A-Records are 5 minutes. However, we cannot guarantee when global DNS servers will propagate and serve the changes. Further, customer devices must be rebooted so they can query and retrieve the updated A-Record
Dual Registration A-Records: This method is inferior to SRV based redundancy and is known to have issues with certain device <> firmware combinations.
In this method 2 SIP Servers are configured on the device.
How and when devices perform DNS lookups may vary from model to model. In most cases it will look like one of these examples.
During bootup the device will query a DNS server for the A-Record of its configured Primary SIP Server. The response will contain a single IP. In some cases it may query the A-Record for both the Primary and Secondary SIP Servers at the same time.
The device will then attempt to connect to the Primary SIP Server via that IP.
Should that Primary SIP Server become unresponsive or unavailable, and if the device hasn’t done so already, the device will lookup and attempt to connect to its configured Secondary SIP Server.
*The switching experience from primary to secondary sip server varies from device to device.
Voice Network Details
DC Tech operates as a Active/Active Geo Redundant Infrastructure to best meet the needs of our partners and your customers.
Below are the addresses and related IPs for different segments of the network.
We recommend that you always use auto provisioning, and if manually configuring a device, use its SRV feature, to benefit from the best available redundancy methods.
We also suggest that you avoid using a specific DNS A Record or direct IP if manually configuring a device.
SIP Servers
IMPORTANT: If using this list to white list IPs on your local router or firewall, please ensure you whitelist all IP's or you may experience a service interruption during a maintenance or failover event.
| Address | DNS A record resolution IP | SRV record resolution IP | |
|
SBC Global |
|||
|
SIP Trunking T38 IP-Fax Legacy Hosted PBX |
sbc.simplelogin.net |
192.92.8.30 Primary 64.52.82.30 Secondary |
192.92.8.30 64.52.82.30 |
| PBX East | |||
|
Hosted PBX Hosted Call Center |
pbx1.mia.simplelogin.net pbx2-mia.simplelogin.net |
192.92.8.71 | All PBX IPs in varying order based on network needs |
| PBX Central | |||
|
Hosted PBX Hosted Call Center |
pbx2.dfw.simplelogin.net | 64.52.82.25 | All PBX IPs in varying order based on network needs |
| PBX West | |||
|
Hosted PBX Hosted Call Center |
pb1.sjc.simplelogin.net | 64.52.83.20 | All PBX IPs in varying order based on network needs |
Codecs
DC Tech operates transparent proxies and does not perform transcoding. This ensure your media does not suffer any quality degradation from the transcoding process. Offered codecs will be negotiated by the SIP Server and a matching preferred codec will be used.
Supported Audio Codecs:
G.711U (PCMU)*
G.711A (PCMA)
G.722
G.729*
*Note: These codecs should always be enabled to guarantee call completion.
Supported Video Codes:
H.263
H.264
DTMF
RFC2833 should always be the preferred DTMF method.
IP Fax
DC Tech supports IP Faxing via T.38 and G.711 fallback.
T.38 faxing is supported on most DIDs and Termination carriers and initiated via a T.38 re-INVITE.
IP Fax
WebFax User Guide
This guide provides an overview of how to use the WebFax service, including sending faxes, viewing fax history and editing fax settings. This view is only available to the WebFax accounts assigned Primary User. Office Managers can masquerade as the Primary User to access this view.
View Fax History
1. While logged into the PBX portal, go to the Fax menu option. This is visible to on Users the My Account page. This page will list all your inbound and outbound faxes along with their status.
2. On the top left side you have the option to filter your faxes by direction and see the assigned fax numbers.
3. To view a fax click the Download or View icons on the left of the table.
4. To delete a fax click the delete icon on the right side of the table.

Web to Fax
1. Click the Send Fax button
2. Click the Browse button to attach files any files.
3. On the Caller ID field select one of your assigned fax numbers
4. Choose if you'd like to include a virtual cover page. If so complete the Cover Letter fields.
5. Once complete click Send.

Print to Fax
Print to Fax is a very popular way for sending a fax from any PC. It is not compatible with Mac Computers.
1. From any app that you can create, or view a document you want to fax, go to File >> Print.


Email to Fax
Email to fax is available to the email address set on the Primary User. The email to fax system will recognize the sender by matching to this email.
1. Send an email to faxnumber@ipfax.net (including "1" and the area code). For example: 13055551212@ipfax.net.
2. In the Subject field enter the word "pass" a space and then your portal password.
3. The Body of the email can be used 2 ways:
- As a cover page if email contains attachment(s).
- As the fax message itself if no attachment is added.

4. Once you send the email, our fax server will convert it and relay the transmission to the destination. Delivery notifications will be sent in an email and look like this.

Edit your Fax Settings
1. Go to the Fax menu within your PBX portal.
2. Click the Settings button on the right side of the page.
3. On the Enabled Method field you can select how you receive inbound faxes. Only select 1 option.
- Email will deliver inbound faxes to your email and allow for the full range of services by portal, email and print drivers.
- ATA will deliver inbound faxes to your fax machine, has the option to copy your email allows for the full range of services by portal, email and print drivers. When selecting ATA a device MAC field will appear. Enter the MAC address of the fax g/w and the device will self configure next time it connects to the internet.
How to Setup T.38 Fax
- Open grandstream page
- Hint. Can call *** then enter 02 to obtain IP address
- Click on FXS Ports tab
- Update the following values to the following
- Primary SIP Server: sbc.simplelogin.net
- SIP User ID: Copy from Portal
- Authenticate ID: Copy from Portal
- Authenticate Password: Copy from Portal
- Name: Fax1
- Register expiration: 5
- Disable Call-waiting: NO
- Disable Call-waiting Caller ID: NO
- Disable Call-waiting tone: NO
- Perferred Vocoder (in listed order)
- PCMU
- G729
- G722
- Fax Mode: T.38
- Jitter Buffer Length: High
- Click Update
- Click Apply
- Click Reboot
- Go back to portal
- turn on Caller ID Override & set to fax number.
- Assign or purchase numbers
Phone Numbers
SIP Trunking
Audio Conferencing
VoIP Troubleshooting Tools
Hosted PBX
Cradle to Grave Overview
The Cradle to Grave feature is an extension of the existing Call Trace functionality that allows more users to troubleshoot issues by presenting high level info in plain English.
The Call Trace is a comprehensive listing of all technician information captured during a call. While this is useful for isolating problems, it's also more information than non-technical user generally needs. By presenting the Cradle to Grave information, non-technical users are empowered to see where a call may be failing and be able to fix or report the issue without escalating the issue.
If needed, the full Call Trace information is available by pressing the View SIP Flow button.

View Cradle to Grave Information
To observe the Cradle to Grave information, log into the Portal (with a scope of or higher than Call Center Supervisor) and navigate to the Call History.

Click the icon to see the Cradle to Grave information for the specific call:

Click the icon to see the Cradle to Grave information for the specific call:
Schedule a Meeting
This article provides instructions on how to schedule a meeting for future use.
Note: First time users must ALLOW the browsers Camera and Microphone permission request or your audio and video will not work. Camera permission are required for screen-sharing
Schedule a Meeting
1. While logged into the PBX User Portal click on the Apps menu
2. Select SNAP.HD Meetings to open the App.
3. Click Schedule a Meeting
4. Input your general meetings details
5. Add People you want to Invite. You can select other system users or type in any external email address. The system will send these users an invitation email with the meeting details.
6. When complete click Save


Router & Network Help
10DLC - TCR Messaging Compliance
User Guide
Please click here to see the PBX_User_Guide.pdf.
Admin Guide
Please click here to see the PBX_Admin_Guide.pdf.