G Radio 2-Way Portable LTE Push to talk (PTT) Radio Manual
Device Introduction
The DC Tech G Radio Portable LTE PTT Radio can provide VOD services (Voice over data) to almost any location utilizing cellular broadband technology. Fast, reliable and private communications are now just a simple click of the push to talk button provides continuous connectivity for voice communications.
Package Contents
- G0 Radio Portable LTE PTT Radio
- 1 x Pre-Installed Nano SIM card
- 1 x Headset Microphone Cable
- 1 x USB Power Adapter
- 1 x USB-C Cable
SIM Card Information
A SIM Card WILL be preinstalled in the radio
DO NOT REMOVE THE SIM CARD unless told to do so by a support team member.
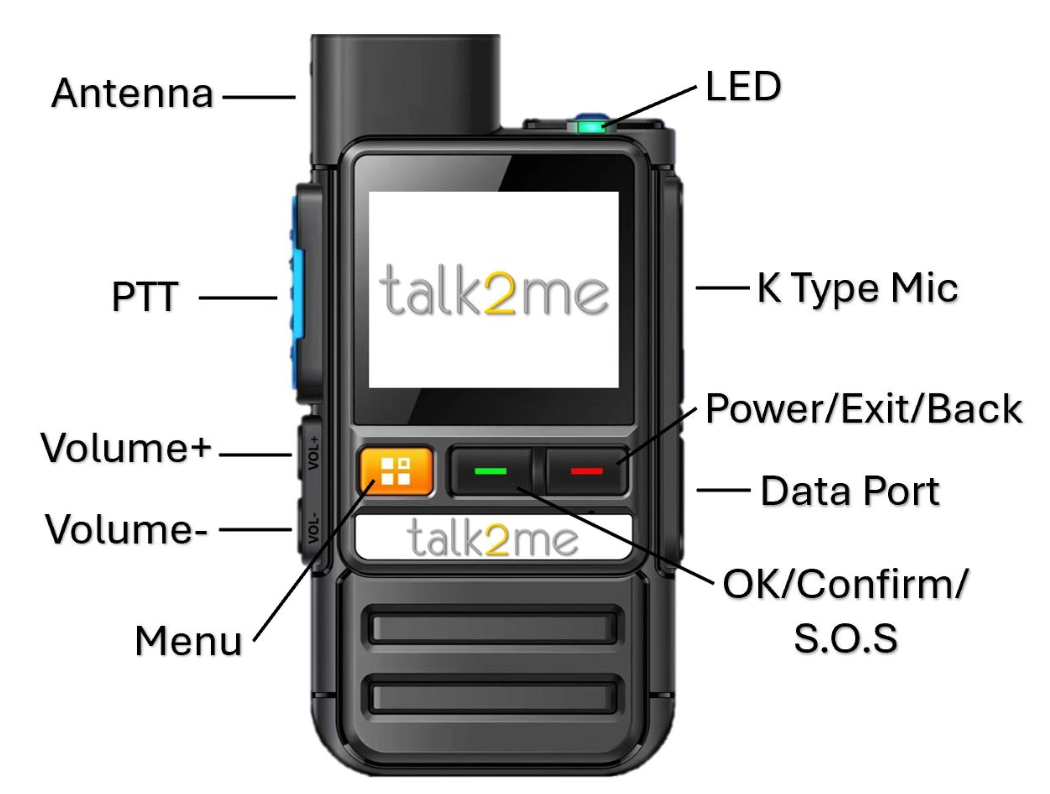
Now that you know your buttons we power on the radio, all other functions will be discussed later in this manual.
Power On/Off key (Red back key)
• Push in and hold the Power button for 3 seconds to turn on the radio.
• Push in and hold the Power button for 3 seconds to turn off the radio.
Once the radio has powered up you will be taken to the main display screen below:
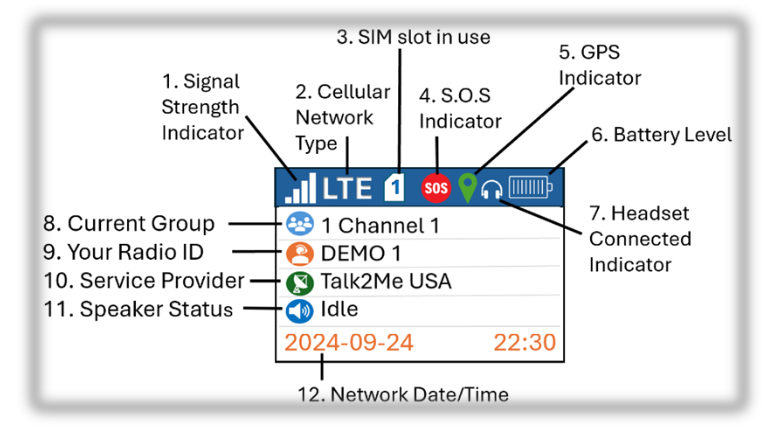
Front Panel Display Screen
The radio displays status information on the front panel. (From top to bottom)
1.Signal strength: Displays tower radio signal strength.
2.Connected Technology: Displays radio network type.
3. SIM Slot: Displays current slot in use.
4. SOS: When the SOS red icon is displayed, the SOS feature is available. Go to SOS features page for more information.
5. GPS Icon: When the GPS icon is displayed it means the feature is activated, when the icon turns green it means that radio unit has GPS connectivity, see GPS features for more information.
6. Battery Icon: Shows current battery levels, more detailed battery information can be found in the radio’s settings menu.
7. Headset Icon: When displayed this means radio audio is going through the earpiece/microphone headset.
8. Group Icon indicates current group channel.
9. Member Icon indicates your current member’s ID name.
10. Service provider indicates current radio network being used.
11. Speaker Icon: Idle means listening to the channel, Red Speaker Icon:
Member indicates current member speaking.
12. Time and Date indicates current date and time from the tower.
Functions of the Radio
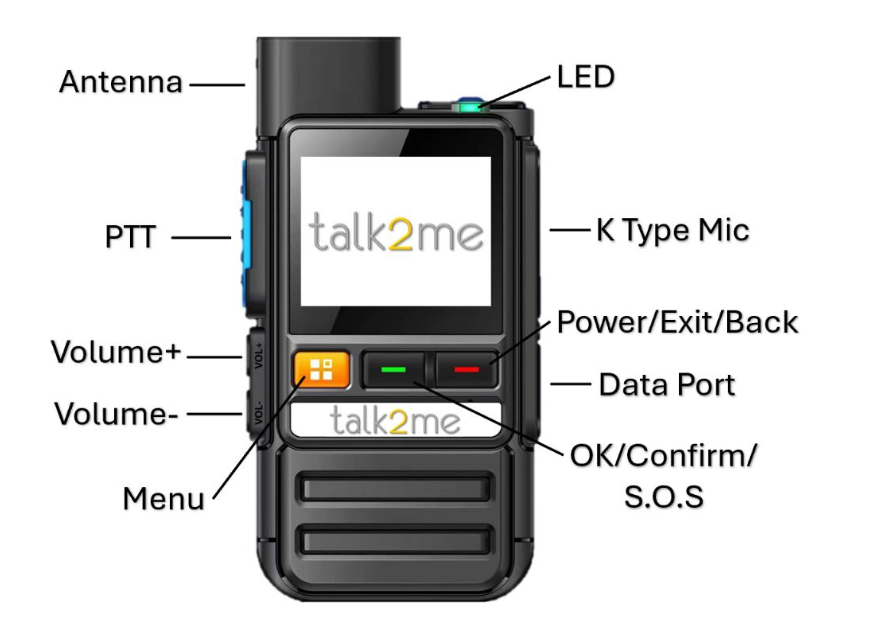
1. PTT (Push to talk button on microphone). – The large push to talk button is located on hand microphone and is easy to use. Just press and hold for 1 second before you start talking and then hold while transmitting your message and then release when done.
2. Vol+/Vol- - These buttons control the volume of the radio and also are the up and down selectors for any options.
4. Power/Exit. – This button allows you to exit any current menus options and also services as the radios off and on button, See Power button for details.
Options Menu
There are 4 options to choose from when pressing the menu button.
A. Group.
B. Member.
C. Settings.
D. Mine.
To choose from any of these options use the Vol+/- buttons on the side of the radio and then hit the OK button to enter the desired menu.
The following option allows you to select the desired GROUP channel you want to enter. Use the Vol+/- buttons on the side of the radio and then hit the OK button to enter the desired group.
The following option allows you to select the desired member you want to have a 1 on 1 private conversation with. Use the Vol+/- buttons on the side of the radio and then hit the OK button to select the desired member. Reminder that the member must be online to communicate with.
The following options will help you customize your radio unit. The number
below corresponds with the settings option.
Available options are:
1. Display settings.
2. Volume settings.
3. Keypad Lock settings.
4. Key wakeup settings.
5. Call in wakeup settings.
6. Voice play settings.
7. Power savings settings.
8. Signal value information.
9. Double card SIM card settings.
10. Battery Information.
11. Service Information.
12. GPS Information.
13. IMEI QR Code and Information.
14. Restore factory settings.
15. APN settings.
1. SOS - Emergency Call
This feature allows the company dispatcher to know when a radio unit is experiencing an emergency that requires priority attention. Once a radio unit is subscribed to the SOS service a red icon will appear at the top of the radio display screen (see example below):

To activate the SOS Emergency, call on your radio hold down the OK button for 3 seconds and this will automatically send a signal to the company dispatcher and other radio units that the SOS is active and provide other units with location information and your Radio ID for immediate notification, all users in the group with SOS activated will receive this information. It is important that you use this option in conjunction with a company dispatcher account as only the dispatcher software can clear the SOS alert.
2. GPS Device Tracking
This feature allows the company dispatcher or mobile application users to the exact location of the radio units assigned with this feature.
• When the GPS icon is white this will indicate that the GPS is available but unable to receive a signal from the satellite.
• When the GPS icon is green this will indicate that the GPS is receiving a signal from the satellite.
Radio functionality tips.
Features and tips:
Poor and no signal issues:
Note: When in a weak signal environment and with poor call quality, you can choose power save mode or normal mode. The call quality will be improved, but the machine also consumes more power.
Automatic screen shutdown:
If there is no button operation within the set time, the radio will automatically shut down the screen.
Transmit prompt sound:
After enabling this function, press and release the PTT key will emit a "beep" prompt sound, which will improve the call experience. When this function is turned off, pressing the
PTT key will result in no prompt sound.